Denim Jeans Tutorial using The GIMP
June 10, 2008
This is an adaptation of “Creating Denim in GIMP by *fence-post” from DeviantArt. I’ve changed it so it is relevant to texture creation in Second Life. But I encourage you to read or bookmark the original tutorial as well.
This is a pretty advanced tutorial… It’s not recommended for anyone new to The GIMP, or to clothing creation. However, if you understand the basics of GIMP and the templates, this could be *just* the thing you are searching for to really bring your creations to life. The principles can be applied to ALL you future creations and you will probably benefit greatly from learning some of this stuff.
The final creation will be up for sale for 1L in Afton’s “Dollarbie” shop at HSPL . Click the link to grab a pair now.
This is the poster to look out for.

Are you ready to get cracking? The tutorial starts immediately after the cut…
Clean Blue Jeans Tutorial
Using The Gimp version 2.4.6
All images are smaller previews for faster website load times. To see the full resolutions, with readable details, please click on any of the pictures and the full size will load.
Step One
Open up you basic templates. For this one I’ve chosen to work with the templates by Chip Midnight at 1024 resolution. Create a new layer on top of all the avatar mesh guides. Name it something simple like “Solid Blue”. With the colour picker open, find a blue colour you like, any blue is fine. For mine, I chose to use 393a6e. Fill the new “Solid Blue” layer with your foreground colour.
Step Two
Now we’re going to make some noise (makes a silly joke about the crowd going wild 😉 ). Go to Filters >> Noise >> RBG Noise…

The default values are 0.20 for red, blue and green with 0.00 for alpha, we leave them alone. Make sure “Independent RBG” is unchecked, that way its a uniform colour of noise, not a rainbow one- hehe.

Step Three
Add a new transparent layer above, and fill the new layer with a scan line pattern (click *here* to download from DA). The screen shot won’t show much, so I am not including one. The pattern is just a tiny repeating black diagonal line.
*** So far, all of this had been pretty basic… Now on to the more challenging stuff! ***
Step Four
We’re going to use the Bump Map tool within The GIMP. (Honest opinion, bump mapping is a lot easier/smarter in GIMP than in Photoshop- so there!! XD ). Moving right along…
Make sure you have your “Solid Blue” base layer selected (the one with noise added). Go to Filters >> Map >> Bump Map…
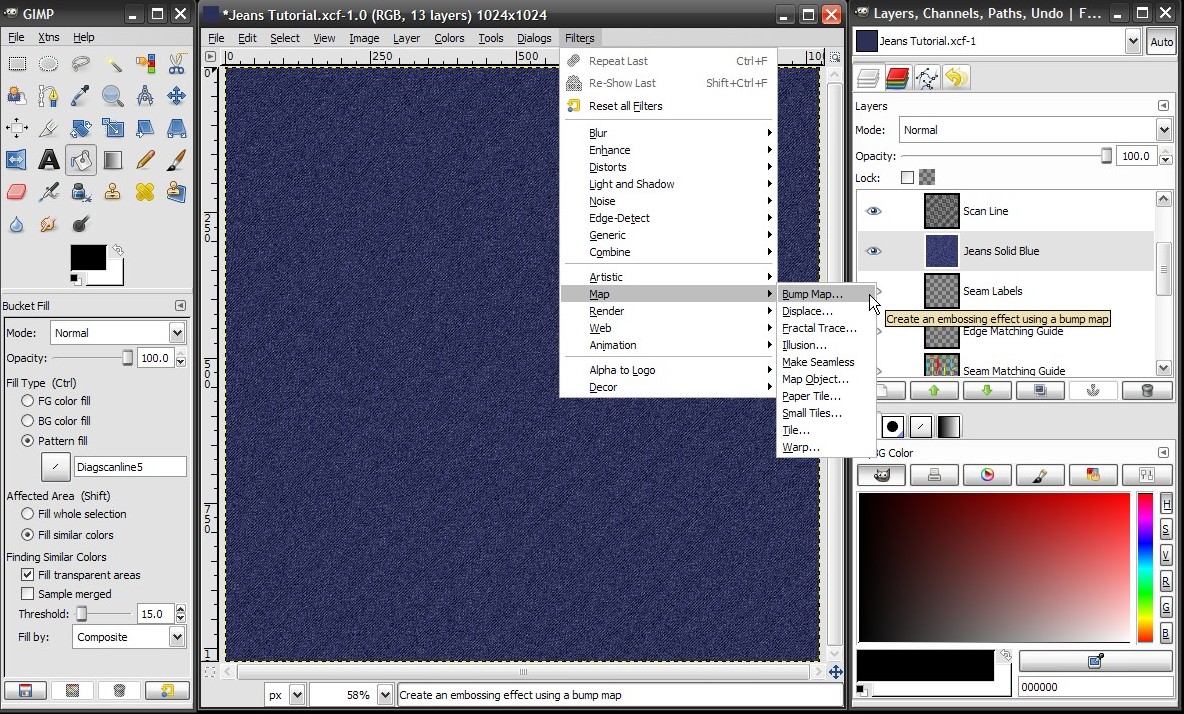
Select the Scan Line layer as your Bump map from the drop down menu. Then, using the next screen shot as a guide, use the following settings. Feel free to experiment, but this is just to make things easier the first time around.

Step Five
You can either hide or delete the scan line layer now, we’re finished with that part.
Step Six
You can go back to your “Solid Blue” layer and add more noise if you want. Its not a compulsary step. I only added 0.10 worth of RBG noise again, just to rough it up a bit more.
*** So far, you should have something resembling a square of denim. We’re now moving on to adding details like the seam highlights and shadowing. ***
Step Seven
Create a new layer and name it “Side Seams for Front”. Along the side seam, on the front of your pants template, draw a white “seam” all the way down, on both sides. I am using the paintbrush tool, with Circle (11) selected. Seems to be the perfect size for seams (seems/seams- lol).
*** For this step, if you bring Chips “Seam Matching Guide” to the layer above the Solid Blue, and below your new “Side Seams” layer, it makes things a lot easier to figure out where to put it. As a tip, only follow the inside of the guide, and keep it at the size 11 brush. That worked well for me. ***

When you’ve done your white line, put Chips Seam Matching Guide back below your Solid Blue base layer. Go back to your Solid Blue Base layer, and create another new layer. (Above the base, under the white lines you just drew) and fill it with black. Merge your white seams, down to the black layer, and again, rename it “front side seams”.
Step Eight
On this “Front Side Seam” layer, we want to make it a bit less harsh, so go to Filters >> Blur >> Gaussian Blur. The default of 5.0, 5.0 is fine for what we’re working with.

Step Nine
We’re going to use Bump mapping again, sort of like we did before with the scan line pattern, this time to get a raised and shadow effect for the side seams. Select your Solid Blue Base layer (the one we want to bump ;), are you getting it yet?)
Go to Filters >> Map >> Bump Map. From the drop down menu for Bump Map, select the black and white layer you just made for side seams. From the screen shot below use the following settings (again, feel free to fiddle with them, this is just a starting point to make it easier the first time). In the preview window you can see the result of my settings.

As before, you can now either delete or hide the layer we used to bump map. I personally hide them, because they might come in handy for highlights or shading.
Step Ten
Now we’re going to “liven up” the side seam a little. We have its location “bumped”, and its easy to see. So next, we’re going to add some wrinkle effect to the seam.
Create a new transparent layer above you Solid Blue base layer. Name it “Side Seam Wrinkles”. For this, I am using the paintbrush tool again in white, with a few tweaks… Brush is Circle Fuzzy (05), but I have checked “Fade out” and set the length to fade out to 20px. The reason I’ve done that is because if you make a stroke left to right, it will fade by the time it reaches the other side of the raised seam. Then you can stroke right to left with the same result.
SUPER closeup shot to explain…

Keep going until you’ve done both seams, the whole way up and down.. We’re going to use this “Side Seam Wrinkles” layer to bump map again.
Step Eleven
Select your “Solid Blue” base layer again, go to Filters >> Map >> Bump Map… From the Bump Map drop down, select the “Side Seams Wrinkles” layer you just made. I am tempted to not give a screen shot, and just let you figure it out, but I am too much of an information junkie to skip that- lol. If you want to use the following settings, please do, if you want to try it by yourself, go for it!!

Step Twelve
Now for something completely different! Instead of hiding, or deleting the side seam wrinkle layer, we’re going to use it to add some highlights. This is why I keep them!
Select your “Side Seam Wrinkles” layer, and change its blending mode through the layers tab. I switched the blending mode to “Soft Light” and left the opacity at 100%, but you can also use dodge, or overlay, or hard light and so on and so forth. You may need to change the layer opacity if you use another blending mode as well. Feel free to experiment.
*** While we’re on the topic of Maps… I’m going to introduce the “Displace” map option. Bump Mapping, I guess is similar to embossing your base texture with another layer, making height and depth, a fake Z coordinate. Displacement works by shifting/moving the base texture to a new X & Y coordinate. So Bump is depth (height), displace is location (side to side or up and down)… That is definitely NOT a technical explanation *giggles* but it should help you understand the difference. NEVER use a SOLID layer for displacement. You will throw off the whole template coordinates, so just be warned. To use the Displace option, ALWAYS use colour on alpha.***
Step Thirteen
Select your Solid Blue base layer. Go to Filters >> Map >> Displace…

On both X and Y drop down menus, select the “Side Seam Wrinkles” layer for displacement. Here is a screen shot for the settings I used.

Step Fourteen
Now we’re going to make a “Stitching” layer. So create a new transparent layer, above the side seam wrinkles. Name it “Side Seam Stitching”.
Grab the Path Tool, and create a path along the outer edge of the left side seam, top to bottom. When you reach the bottom, hold down the SHIFT key, and click the inner edge of the left side seam, and create a path bottom to top. When you reach the top, hold down SHIFT again, and click the inner edge of the right seam, and go down, hold shift again at the bottom to create a new path on the outer edge.
*** By holding down the Shift key when moving to another path, you’ll create a multi-component point and each will be stroked individually. If you didn’t hold down shift when starting a new line, everything would be connected, and you would have to erase what you don’t want after.***
Step Fifteen
With your paths in place, we now want to select a colour for the stitching… something deep gold. I’ve used b28226 as my stitching colour. Next, go to Edit >> Stroke Path…

Pay attention to the Line width, the Line Style and the Dash preset.

Click on Stroke at the bottom of the dialog box.
Yay! Dashed lines that looks like stitches, without having to do it by hand!!

Step Sixteen
This is an optional step, but you should be used to “Mapping” by now, so I encourage you to give it a shot… We’re going to bump map, or displace the “Side Seam Stitching” layer this time, using the wrinkle layer as our bump map. Select your “Side Seam Stitching” layer. Go to Filters >> Map >> Bump Map, select your “Side Seam Wrinkles” layer from the drop down and mess around with the settings.
No screen shot this time, just play. Same with displace. Just mess around. You can always “Undo” if anything goes wrong.
Step Eighteen
This is a revision time.
Keep doing this for ALL the pieces you might want!!! You can continue doing all of what we’ve covered, on every other “bit” to get the rest of your details to “pop”. I’m not going to keep repeating the above steps for each new piece of the jeans, but I will revise what we’ve covered so far. From here, you can use the above methods, over and over, for the other details on your jeans.
-
For new details, create a new layer, and paint the big basic shape in white.
-
Apply a small amount of Gaussian Blur so the edges aren’t too harsh.
-
Select your Base Layer (the Solid Blue base layer, the one you want to “bump”). Then go to Filters >> Map >> Bump Map.
-
Use the layer you just made as the Bump Map from the drop down menu, play with the settings to get the amount you want.
- Bump mapping raises/lowers the texture, displacement shifts it on the X & Y coodinates.
-
The same layer you have used for bump/displace (white on alpha) can also be used to add more highlights. Just change the blend mode and/or opacity.
-
To add seam wrinkles, set your paintbrush to fade out. And use both bump and displace maps for effect.
-
With your path tool, we can stroke the path to create a dashed line resembling stitches. If you hold down shift when finishing a new path, and moving on to the next, you create a multi-component path (separate strokes).
So far, after all that detailing, repeating the steps over and over, I have come up with this… All the bits are in the right place, and my texture has texture.

*** I’m putting up a greyscale JPEG you can save if you are struggling with “where” all the details go. That way you can trace over the top for placements, if you need to. It simply shows my personal locations for the fly, the front and back pockets, the waistband, and belt loops. As I said, its crude/simple/basic… because following the steps above, you can work your own magic. ***

Step Seventeen
Aha!! She exclaims with glee! By now you should be getting a good grasp of all the basics… but NOW we’re going to use the same methods, for WRINKLES and SHADOWS!
Create a new transparent layer. Name it “Big Shadows”. Paint some big, black, blurry shadows. Looks horrible, but this is a pretty nifty way to add shadows and wrinkles to your designs.

Bump map the base layer, using this layer. These are the settings I used.

I’ve kept the “Big Shadow” layer visible, changed the blend mode to burn, and set opacity at 20%.
Make another new layer, and this time we’re painting thin “tight fit” wrinkles in black.

Bump map the base layer, using the Thin Wrinkle layer. These are my settings.

As above, I’ve kept the layer visible and changed the blend mode and opacity.
Step Eighteen
Grins… the final step I guess is what make this “pop” a heck of a lot more. So far, we’ve covered adding texture, to the texture itself. We’ve added shading and highlights, created our wrinkles and stitching… but we still need some extra shading to complete it though. This is what my jeans look like, ALMOST finished…

It’s ok, but it does need some extra *oomph* with some simple shading. I’ve used a “Fake Bake” texture I originally made in PS. Its a greyscale layer, and it comes in SUPER handing for this exact reason.

I place it on a new layer, above everything else, and set the blend mode of this layer to Multiply, and dropped the opacity to 75%.

LOOKING GREAT NOW!!!! Yays!!!!
Step Nineteen
Within The GIMP, you have a few ways you can make it ready for upload to SL. One is by using an alpha channel, the other is by turning off/erasing/masking the layers… By now, you should know how to do any or all of the above. I prefer to mask out what I don’t need of the base with layer masks, as GIMP automatically transfers that info to the alpha channel. Save your work as an XCF or PSD… so if you need to edit anything later on, you have all your layers to work on.

Then you are ready to save it as a TGA, and upload it to SL- wooohoooooo!!! You’ve just made your own jeans!
These jeans will be available in Afton (Slurl) as a dollarbie. Along with a link back to this page. Now go forth and create!!! I am posting another pic of the Dollarbie vendor that will be up for grabs in Afton. Click on the poster for a SLurl to grab a copy of what I made.

As always, play nice kiddies! *Smooches*. I hope you enjoy!
Time for me to make my exit, ta ta for now!

Where and how did you make the ‘fake bake’ texture you used?
Thank you very much!
Interesting blog!
Thanks to author for this information!
I found this tutorial very useful, and even though i am new to gimp, i managed to follow it and produce some jeans, but the fake bake was really vital for bringing it to life, so i would also love to know how this was made, or if there is also one for the top half.
Thank you
I’ve tried numerous times too do this in Gimp but for some reason it keeps freezing, crashing or making my files unusable. Is there a tutorial out there with the same but using Photoshop instead??
seems the secret sauce is in that “SL Female Normals Map” layer. Do you that available for download someplace?
*smiles sheepishly and waves*
Kick my butt, please. I have been an absent blogger, not keeping track of what’s going on here.
I am so pleased you’ve found it useful, and “do-able”, I worry that I ramble too much. LOL!
In response to all the queries over the “fake bake” that I used, I found it on the official SL forums. The initial entry for it dates back to December 2006, and the unfortunate thing is those forums EAT attachments after a few hundred views.
It is a SUPER COOL thing to hunt down and see if you can get to work though. This is what happens when you put Chip Midnight (God) and Abu Nasu (lesser known but equally impressive God) in a room together! 😛
The original forum link can be found here:
http://forums.secondlife.com/showthread.php?t=155651&highlight=avatar+topography+guides
You will need to log in with your SL account details to view the forums, I encourage you to read it all to understand how it all works.
On the down side, the filter made by Abu Nasu is for Photoshop ONLY and then PC ONLY. It won’t work in The GIMP, and it won’t work for Mac or Linux users.
On a positive note, I’ve written up another GIMP tutorial very similar to the one above for a sweater. It uses the “fake bake” on the upper template, so those of you who just want to save the fake bake outcome are welcome to save it to their HD for use later on.
They use the same falloffs as the one I used above for the jeans… so in theory should be seamless around the waistline.
I *plan* on uploading the sweater tutorial at some stage today, hopefully you guys can grab it, if you want it.
Have a good one!!
First of all: Awesome tute. I haven’t got it 100% working yet, but I’ve learnt a ton, just trying to. 🙂
Thank you!
Also, the jeans in the advert above look really dark on my LCD monitor (set to 100% brightness). I don’t know if the discrepancy is at my end or your end, but it makes your awesome work look really ordinary. 😦 You might want to check on a couple of other monitors to see.
Heya Irrevenant,
Firstly- I’m glad you’ve learnt something by attempting the tutorial. I am a HUGE fan of how The GIMP uses bumpmapping! It kicks PS’s butt!!!
Second… You are not the first to comment on the dark appearance of the jeans (or the sweater for that matter). It amazes me that monitor colours can differ so greatly between computers.
My *beast* died this week, and I have been borrowing my BF’s machine while mine is in being fixed. All the specifications on his laptop outrank mine *but* his colour settings are waaayyyy below what I have- which is just WEIRD! Seeing the world through someone elses *eyes* takes a while to get used to. 🙂
And the moral of the story is… (*giggles*)
While everyone might be looking at the same thing… Everyone will be seeing it differently depending on their own machine.
That’s a good thing to keep in the back of your head when you are making *anything* for SL. 🙂
** Personal note to self: any further tutorials should be done is pastel hues- rofl! **
Have a good one!!! TOOOOOOOODLES!
Hi i have been try everything step by step but they look like females jeans look great but im looking for a male one .. or fake bake male 1? do u know where i can find one?
Hiya Reese!
Good timing, sort of. The next post I am putting out will be about Tech Slop and Abu Nasu. Creator of the Photoshop plugin that allowed me to make the *fake bake*, and creator of my most recent favourite toy “Multi Chan Hax”.
I realise the method of creating the fake bake is limited to PS, SO for those of you with GIMP, I will also post images for both male and female which you can slice up in GIMP.
Give me a day or two to get the files saved and the post written, and you are more than welcome to save my results for your own use.
Take Care OXOXOX
thank so much Claire ur the best 🙂
I’m not even logging on to SL tonight! I’m gonna play in the Gimp…or the Photoshop..er..ok the PSP! And I’m gonna play with the fake bakes. 🙂 Wewtie!
Thank you!
Hahahaha- breathe MoxZ, breathe! There’s plenty of time for everything ;).
HAVE FUN!!!
AWSOME tutorial!! I’ve always wanted to know how to get those effects in GIMP. I absolutely love GIMP, and I’ve made clothing via templates for a while, but with no real special effects. I can FINALLY do some wrinkles and shading, instead of relying on someone’s texture that I’ve spent a ton on to do it for me!! Yay!!
I completely love this tutorial,
but I really am stuck at step 3 -_-
How do you fill the new layer with the scan line pattern?
Sorry, Im a paint.net user,
and just started with gimp XD
[…] Originally Posted by HarukaZsun They have too be the hardest garment too make and i bet half the clothing out there has been photoshopped in one way or another. Not a clue what you mean by photoshopped…. every clothing item in SL was created using a graphics editor. A basic pair of jeans is easy. And not harder than any other type of clothes. Here is a good how-to Denim Jeans Tutorial using The GIMP � Random Ramblings, Tip & Tricks […]
Ah, my life is changed! I *never* would have thought of using Bump Map this way! I’ve been manually drawing in shadows with different shades and/or using dodge & burn, but this looks just as good, if not better, 90% of the time.
hi, one question, im starting with one layer how did you get twelve if this is a tutorial from the beginning. is it possible you can show from before this tutorial since i am a bit new to gimp and this makes no sense at all
Thank you for the Gimp Tutorial.
I only use GIMP now because of the innovative
things people can come up with.
Hi there,
Awesome Tutorial, but would love to know how i can make rips in the jeans? can anyone help pls?
To Rian and AliceS… I’m not brushing you off in the least but if you are *newbies* to The GIMP you might want to try simpler tutorials and come back to tackle this when you are a little more comfortable with the program. This tutorial was aimed towards “older hands” wanting to get more out of The GIMP. If I had found this tutorial when I started out, there would be no way I’d be able to follow- that’s the honest truth.
To slayora, Neena and Mayren… *grins* While I have/use Photoshop just as much as The GIMP… The GIMP *kicks much butt* over Photoshop for how it handles bump-mapping. I *still* think this trick is awesome!
To Valerie… Head over to Obsidian Dawn for denim jeans rips and tears. They are for PS and GIMP, and a tutorial is included so you can make the most of them. In order to be able to SELL anything you make with her brushes, here is a cut and paste of the terms of use:
“If you cannot provide credit and want clear-cut rights to be able to use these brushes in your designs, you may purchase a commercial license.”
These are CHEAP and QUALITY. Do the right thing if you plan on using them for SL content creation.
And here is the link to the rips and tears brushes:
http://www.obsidiandawn.com/ripped-jeans-photoshop-gimp-brushes-tutorial
[…] One tutorial to make jeans. […]
Hi.Which programe did you use for this.I am a textile engineer and graphic designer.I want to join thhose my skills.How can I do this.Where you use photoshop in textile or how can I use it in denim design.I only do poster and logo.
how do you get the scan lines?
I went to the website you provided but when I open it as a layer, its too small?
Am I supposed to open it as a layer or what?
=P
The scan line pattern must be installed as a pattern. You need to paste it in to something like C:\Program Files\GIMP-2.0\share\gimp\2.0\patterns and then it should be available as a pattern fill option. http://lmgtfy.com/?q=Install+a+pattern+in+The+GIMP *giggles*
UM were do u get the fake bake greyscale thing i need it e mail me tysean15th@aol.com
ty, take a look at my other tutorial for RGB Theta, you can find some greyscale bakes in that post. 🙂
Thank you so much for this tutorial! ^.^ The only problem is that I’m lost on how you did the little rivet or whatever for the fly. 😛
Lindsey, for the button/rivet thing… this is a general idea of how to go about it.
Go to Filters >>> Decor >>> Add Bevel and change the thickness depending on how big your document is.
For more realism, add a drop shadow as well.
Go to Filters >>> Light and Shadow >>> Drop Shadow. Again, change the settings to suit your document.
Hi! First off, I love the tutorial! It helped me in so many ways, but I’m having a problem. I followed Step Two through Step Five exactly. I’m not sure how to explain my issue. It seems that the noise and scan lines are too large. In gimp and in SL my jeans are blotchy because of the noise and the scan lines are far apart and large in size. I’m not sure what I’m doing wrong. Any advice would be helpful. Thank you!
First question, are you working on a 1024×1024 image?
The settings might appear too large if your image is sized at 512×512.
That’s easily fixed by going to Image >>> Scale Image >>> 1024×1024 at the very beginning.
If you enlarge it after you’ve applied noise or the scanline pattern it won’t look any different. 🙂
If you still find the noise too noisy 😛 you can reduce the RGB values to 0.10.
The scanline pattern is TEENY-WEENY! 3×3 pxls if i remember correctly O.o
My advice here would be to turn down the opacity, maybe? Let me know how you go. 🙂
I now know what I did wrong! 😛 LOL. I was thinking that I had to change the X and Y Resolution from 72 pixels/in to 1024 instead of changing 512 pixels to 1024. Your advice work, and I very much appreciate it! Thank you for your time! And keep up the good work! I love your tutorials. They are very helpful! Thank you again! ^-^
Many thanks for these clothing tutorials and the fake bake textures, Claire. You’ve really helped me get a head start on clothing design. As a thankyou, I bought one of your creations when I picked up the tutorials. I also passed your landmark on to a fellow clothes horse friend 🙂
very nice and cool.. thanks 🙂
hey this was a great tutorial. But I wanted to know how did you get the jeans on the transparent layer at the end of the tutorial? I’m having a hard time trying to do that.
The easiest way I’ve found to prepare an image for transparency using GIMP is as follows.
When you’re happy with your completed design and you’re ready to prep it for upload to SL, select the top layer in the layers palette and then go to Layer >> New from Visible. This will create a single layer with the layer style effects and goodies all merged into one nice and clean working layer. Rename this something obvious like “final design”.
Now go ahead and turn off all the layers underneath.
Right click the “final design” layer in the layers palette and select “add layer mask”. A popup window will appear with a few options. For the most part the options explain themselves, but for now I’ll suggest selecting “transfer layer’s alpha channel”. This gives you a head start and will mask any existing transparency that layer may have had.
Left click on the right hand layer mask (the black and white thumbnail that was just created) and start painting in the transparency. Black is transparent, white is opaque, and shades of grey are in between. You can use all the normal tools to mask, the same as you do when painting.
Now what? Well, to be honest, that’s about all there is to transparency in GIMP. It works as a “What you see is what you get” when it comes to alpha. There are a couple more steps you can do, but it tends to get destructive which is definitely not what you want.
As long as you can see the grey checker board pattern, you’ve got transparency that will translate to SL. At this stage, remember to save as XCF or PSD again. 🙂
Select the left thumbnail of the “final design” layer then you can go ahead and save it as a TGA. There will be a popup window with few options again… so check “Merge Visible Layers” and hit Export… then leave RLE compression checked and hit Save.
Interesting note:
GIMP works very well as a WYSIWYG editor… but there is still one issue that drives me mental. The dreaded “jaggies” or halo where the solid edge transitions to alpha. The good news is there are ways to avoid it happening, and ways to fix it if it happens.
Ways to avoid it: this tutorial was made to avoid that issue *grins*. That’s probably why after 18 months no-one has commented about jaggies or halos. If you start designing with a solid layer (bucket fill colour or pattern), and then use masks you’re going to avoid it. Yay!
Ways to fix it: let’s say you started making something with the brush tool (as an example). GIMP will do an odd thing when you save it with transparency. It will use the background colour (by default the BG colour is white) as the buffer on the edge, which leads to jaggies and halos. Ugh, ugly! So how do you fix it? You cheat a little *giggles*.
Create a new layer and place it just underneath the final design. If the design is monochromatic you can simply flood fill a colour close to the design… and then turn the layers visibility off. Yep… sounds silly, but it works!
If your design is multi-coloured, do the same as above, then duplicate the final design layer and apply a Gaussian blur to the lower layer. Merge the blurred layer to the solid layer and turn off visibility.
Hmmm… this reply probably deserved a post of its own. Oh well, let’s hope people who are struggling read comments. 😀
Good luck and happy designing!
im having a hard time, my toolbox on the bottom dissappeared trying to get it back but how do you get the scan layer and the jean layer together?? also my Scan layer isnt going transparent?? i dont know why
also the Scanline Pattern keeps repeating and not one soild pattern like the actual photo… i dont know how to make it like the photo
The scanline pattern is just that, it is a micro pattern that keeps repeating to fill your layer.
Here’s a basic checklist to start with:
Have you installed the scanline as a pattern?
Are you creating a new *transparent* layer before filling it with the scanline pattern?
Before you go to the bump-map filter are you selecting your “Solid Blue” base layer?
It sounds to me like you might be getting confused because you’re rushing through the tutorial. 🙂
Start again from the beginning, or re-read steps 3-6 and see how you go this time. Make sure you’ve read and completed each step before moving on to the next.
Good Luck!
Hi, your tutorial is really helpful! Im new to designing clothes and using gimp. I just have one question to ask you. How do I get the scan line to cover the whole image? When I import it from my hardrive the scanline image is as small as a pixel and it only shows one scanline. I tried to resize it, but it just made the scanline image huge. How can I make the scanline show like the way you have it in your screenshot?
Thanks for all the help!
The pattern is just a tiny repeating black diagonal line. You will have to install it as a pattern, not open it as an image. You’ll need to copy it in to something like C:\Program Files\GIMP-2.0\share\gimp\2.0\patterns and then it should be available as a pattern fill option. 🙂
http://lmgtfy.com/?q=Install+a+pattern+in+The+GIMP
*giggles* “
Alright so like these are AMAZING tutorials and I LOVEEEE them so much and all that! But I do have a question.. When you do step 19 in the jeans tutorial and the step after the fake bake in the sweater tutorials.. You mention a “mask” of the layer to make it like a pre cut item of clothing like you would find in templates pretty much.. My question is How do you do the mask part I’ve never done that and was trying but couldn’t figure it out. Thanks 😀
Have a read through my reply to Janice Spore ( https://mistressofdesign.wordpress.com/2008/06/10/denim-jeans-tutorial-using-the-gimp/#comment-168 ). It’s pretty much the same answer, you’ve just asked it in a slightly different way.
Short version:
Go to Layer > New from visible
Layer > Mask > Add layer Mask
From the popup menu pick one that suits (eg: layer’s alpha channel)
You will now have a black and white thumbnail of the layers transparency linked to the colour thumbnail in the layers palette.
Paint in black to conceal, paint in white to reveal. Shades of grey will be semi-transparent.
Turn off the visibility of the layers underneath (shortcut: hold down the shift button while clicking on the “eye” symbol. You should now be left with a masked design which is ready to be saved as a TGA for SL.
Hope that helps!