RGB Theta- Photoshop plug-in for SL “Fake Bake”
October 7, 2008
In February of 2010 the official Second Life Forums flicked a switch and moved over to a new fomat. I have edited the links to point to the archives, hopefully you can still follow along. 🙂
Somewhere deep down in the official forum archives you can find this absolute GEM of a filter for Photoshop. BUT- to save you the effort of finding that post (it’s not the easiest thing to find), I’m just going to post the jist of it here. The original thread for this dates back to December of 2006 O.o … WHY this wasn’t stickied I have no idea!
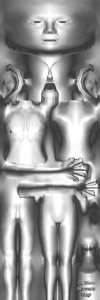
So… what the heck is “RGB Theta”, and what can you do with it? Short answer is- you can FAKE the BAKING process which you would normally need a 3D application for. It allows you to render a lighting effect based around the 3 dimensional avatar figure (or any normal map) WITHIN Photoshop.
All you need is Abu Nasu’s nifty lil plugin, and Chip’s Normal Maps and you are ready to start “baking”.
Sexy advert for where you can find the before and after bodysuits (male and female) if you want to run around looking like a spaceman. Image links to SLurl.
Read on after the cut for more information, as well as links to where you can find these goodies.
This is the thread where it all began… READ THIS. Basically Chip Midnight put up a stack of topography guides of both male and female for us to use. Fantastic by itself, but it starts to get VERY interest by post number 13, and just snowballs from there 😉 . (This is now an archived thread. The information is still available, but without the attachments it may be a bit difficult to follow.)
What evolved from the original post is this super nifty PS plug-in. Credits go to Abu for making the plug-in available for us to use, as well as Chip for his Normal Maps of both the male and female avatars.
———-
You will need:
RGB Theta Filter for PS: As far as I know it’s for PC only. Sorry to Mac and Linux users.
Chip’s Normal Maps: Sadly, these didn’t survive the migration to the archives so “Claire’s Normal Maps” from the link below. Single post from the SL forums. Male and female normal maps as a single image (you’ll have to chop them up once you’re done “baking”). Having them as a single image means the “baking” is exactly the same on all pieces of the template- YAY!!!
Claire’s Normal Maps: This link will take you to mediafire where you can download a PSD with both male and female normal maps. The resolution is 1024×3072 and will still need to be split when you’re done. 3D modeling and rendering isn’t one of my greatest strengths but it gets the job done. These were added on April 7th 2010 because the original forum attachments didn’t survive the migration to the archive.
Install the plug-in (duh!), then open one of Chips Normal Maps in Photoshop. For the bulk of my screen-shots I’m using the female map… cuz she has boobs *giggles*. The boobies are GREAT for showing off how cool this plug-in works. Well… that’s my excuse and I am sticking to it!
Go to Filters >>> TechSlop >>> RGB Theta… and mess around with the settings!
Something to note: The filter only has a single light source, so… you might want to make a front, and a back. These are the settings I have saved so I can load them again and again.
Duplicate the layer to a new document, undo the changes, and then “bake” the normal map again for the opposite light direction.
Duplicate this “bake” into the document we created previously.
__________
You should have a new working document containing both the layers you just made. Next step is making a “master” template you can use of your creations.
First- change the layer mode! I found that by switching the upper layer to something like “screen” you get to see both the front and back effects in all their glory. You can use lighten, screen, colour dodge, linear dodge and lighter colour- they all produce similar effects. When you’ve found a layer mode you like- simply merge it down to a single layer.
(I’m not sure why my “full screen capture” isn’t capturing the full screen… Sorry if the shots are missing any important info!).
I have two “master” images saved somewhere safe in my “SL work” folder. I have one for male, and one for female. They have been saved *as is* for backup reasons (I tend to work destructively… and yes, I get lectured on my methods constantly lol). ANYWHO- save what you have done as a master file, and duplicate the merged layer once again in to a new document. We’re going to slice it up now so we can make use of it all.
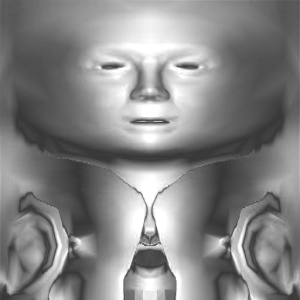
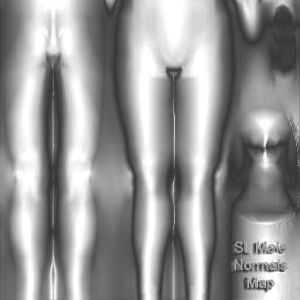
From the original layer, go to: Image >>> Canvas Size >>> 512 x 512 (for the newer normal maps, the canvas size should be 1024×1024) and change the anchor point. This will crop your canvas to head, then torso, then legs. You will have to undo your changes to get the “master file” back, but it’s better than doing it by hand (crop tool and cursor).
Yayyyyy!!!! Now you just need to put these layers in to your OWN master files (Chips. Robins LL standard- whatever your weapon of choice).
To use them:
Change the blend mode to something like “multiply” or “overlay”, drop the opacity to suit your style and BAM. FULL BODY HIGHLIGHTS AND SHADING!!! Play with a layer blend mode to suit your particular design.
Ok, ok, ok… I do need to point out one “bummer”… but it has NOTHING to do with Chip’s jpegs or Abu’s filter… it’s got to do with the PAIN-IN-THE-ARSE template we use for SL.
We only have access to ONE arm, and ONE foot. *grumbles about stupid av mesh some more under her breath*… To be exact (after i looked again at the template lol) we have a right arm, and a left foot- WTF is up with that??!
So… you will have to tweak your outcomes for it to be SEAMLESS. The right hand side of the shoulder (where the arm joins on to the torso) will have to be duplicated/copied over to the left hand side and blended in.
If you’re making socks or stockings or even skins, you will need to duplicate or copy the lower half of the left leg over to the right leg, if you want it to be seamless at the ankle.
STUPID STUPID AV MESH! ROFLOL! They certainly don’t make it easy for us! 😉
Okie dokie- that’s my very general guide on how to use the TechSlop “RGB Theta” filter with Chips Normal Maps. No more talking from now- but I am jamming a bunch images up for NON Photoshop users to play with. I’m posting the original 512×1536 unedited master files first. Then the head, torso and legs for both male and female- all cut up, with the shoulder and foot seams already fixed. 🙂 ENJOY!!!
** CLICK ON THE IMAGE TO GET THE FULL SIZE!!! **
__________
Female 512’s
__________
Male 512’s
Repeated from above for those of you who might have missed it.
Claire’s Normal Maps: This link will take you to mediafire where you can download a PSD with both male and female normal maps. The resolution is 1024×3072 and will still need to be split when you’re done. 3D modeling and rendering isn’t one of my greatest strengths but it gets the job done. These were added on April 7th 2010 because the original forum attachments didn’t survive the migration to the archive.
Woot! That’s me finished for the day! CIAO FOR NOW!!! 🙂


Claire you are the shiznet! Rawk on!
*hugs*
/me googles shiznet… finds out that’s a good thing.
YAY! Glad you’ve found it useful 🙂 .
VERY nice. I didn’t even know about Abu’s plug-in. Thanks for taking the time to write all of this out!
I think Abu’s filter deserved a heck of a lot more publicity than it originally got. I have no idea why it didn’t generate more excitement when he put it up on the forums. Maybe it was the name of it, maybe it was bad timing… but it’s a PS plug-in no clothing designer should be without. And it’s FREE! O.o
Even if you only use it once a week or once a month, the oppourtunity to “bake” within Photoshop just shows how powerful and customizable that piece of software is. BIG THANKS again to Abu Nasu for his plug-in. 🙂
Great post! I wonder how to make this for the system skirt…
If you get a chance to go take a look at the Techslop site, and get to fiddling with Multi Chan Hax (another golden treasure from Abu)… making a seamless system skirt *should* be easy enough. It’s just a matter of mapping the lower section of the torso to the top of the legs… then messing around some more to make it fit the skirt- LOL!
Hmm… perhaps I’ll make one that matches these and share my outcomes with everyone…
That’s something to look forward to *smiles*.
I use the system skirt a lot in my designs, and one of these that matches up to the tops would be REALLY great! 🙂
Back, sort of. In between computer issues and internet issues I’ve been unable to take a crack at the skirt. I’m going to try again tonight while I’ve got PS semi-working again.
Just to make it clear. I’m going to be posting the “greyscale” layer for the skirt, not the normal map. Because the normal map is Chips render from 3DS Max, I don’t think I’ll be able to get “good” results tearing it apart in Photoshop. The greyscale I can *fudge* at least.
Stay tuned…
Wow I just found this blog.. about 3 months late it seems 😛 any updates on that skirt? I see the last post here was in october saying she would work on it that night but no more posts after that. I would like to see this done with the skirt.
I agree! Claire, please, skirt! PleasE! 🙂
Ok, for the time being I do need to answer everyone pleas for the skirt shading. I have managed to do a few which *should* be seamless, but the way it catches light compared to the body makes it look completely wrong in-world.
Because of this I’m not going post any of my results. My apologies to anyone who’s been hanging out for them to be posted.
Maybe one day I’ll ace it, if I do I’ll put them up. But for now I’d prefer not to post below-standard outcomes. 🙂
[…] […]
[…] One to bake light and shading in Photoshop with a special filter ! […]
Great!! The filter also works with PSP (Paint Shop Pro)
The filters should work on any program capable of loading the 8bf filter format. So a handful of other programs should be able to get this thing working, PSP being one of them. 🙂
Great writeup Claire! I’m glad to see that Abu’s awesome plugin is starting to spread by word of mouth. I think most people just didn’t notice it buried in the topography guide thread. He’s also such a mad genius that he tends to explain things in a very mad genius-y sort of way which sails over most people’s heads. Thanks for doing this.
LMAO well thanks for the free advertising of my SIM, this pic links to my beach! If you really wanna come say hi thats great! But you should know that this isn’t the URL ur looking for 😀
*giggles*
xox KC
D’oh! Sorry for the unexpected visitors KC! I’m combing through all the SLurls to make sure they all point to Afton!
Can you forgive me? 😀
hello 😀 i just got cs4 would you be able to tell me how to upload the rgb theta onto that? thanks lots in advance!
Chav, as far as I can tell CS4 still supports the TechSlop filters the same way as CS3, so installation should be the same.
The problem *might* be that you’re running a 64bit version of CS4. If that’s the case the TechSlop filters won’t show up unless you deliberately run the 32bit version.
were to download it for gimep??
ty, the filter code is written for photoshop and so far I have been unable to make it work in The GIMP. But you’re more than welcome to save the greyscale images to your hard drive. 🙂
EDIT!!!! Yeah, ok, I might be obsessive compulsive in trying to work things out…
I can say that as of today I’ve managed to make the techslop filters work in The GIMP. I rock!
However, the instructions will need to be re-written specifically *for* The GIMP so bare with me a few days while I get a new tutorial up. 😀
Been looking for something like this for weeks, I ended up having to make my own map and it frankly isnt as good as this.
Thanks a lot for the work.
Hi. I’m looking for “Chip’s Normal Maps” if anyone knows where they can be found, or could please send them to me (Vextra Messing) inworld.
Thanks for a great tutorial 🙂
download doesn´t possibele ;(
took me a while to understand this thing but is so kool
tyvm for sharing this cool info 🙂
all this filter does for me is make everything a sort of sludge-grey. help please!
Some more information would be helpful. 🙂
If your results don’t look similar to the greyscale copies at the end of the tutorial something has gone wrong. What graphics program are you using? Which version of the normal maps are you running through the filter? What settings are you using in the filter? I’m sure we can figure it out together, I just need more information than “sludge-grey”. ^.^
Hi Ms. Claire,
How can I cut it into three parts (head, upper, lower)? And also theres no ‘Anchor’ in Canvas at GIMP.
Thank you so much in advance.
In GIMP, go to Image > Canvas Size…
In the popup box, click on the “link” icon so that you can adjust the width and height independently. Enter the canvas size as 1024×1024. If you apply the canvas resize now you will have the topmost 1024×1024 piece. Save it as a copy (it’s own unique TGA).
Underneath Canvas Size you will see Offset. Offset by negative amounts (example: -1024, -2048) and continue until you have saved out all pieces as their own TGA’s.
Hope that helps!
Ms. Claire…
THANK YOU SO MUCH..
I improve my clothe-making skills coz this blog..
Thank you so much again!
♥♥♥
Hi Claire.
Thanks for this fab tutorial. I hope you don’t mind but I referenced this blog in a youtube tutorial I made to install and use this filter in GIMP.
The links are here.
Pt. 1 Installing the filter and creating the map
http://www.youtube.com/watch?v=-scy5oDcyx4
pt. 2 splitting, saving and using the shaded map.
http://www.youtube.com/watch?v=_ejHzwMHKp0
Thanks again for a great tutorial.
Darn it! It just comes out black for me in filters 😦
Remember to fix the arms as the shading is inverted.. the top of the hands should be lighter than the sides
[…] […]
Please fix the link for TS3D_rgbtheta.zip plugin
I have updated the link to a new download location (temporarily, I hope) while Abu tries to fix the TechSlop Wiki. 🙂
For Chip’s Normal Maps you have this source http://www.annotoole.com/CMFF/
Chips Templates don’t contain a Normal Maps layer which is needed for RGB Theta to work. The links to the SL avatar Normal Maps are in the post above. You can and should add them to your own working PSD’s (Chip’s or Robin’s) for future reference! 🙂